Setting up a N64 development environment

In this section I’ll list items that you will need to develop for the N64. I’m going to assume that you’re working on Windows 7 or newer. Note that this is going to be a fairly long list and will be added to as I learn more about the SDK and which files need what editing.
Windows XP 32-Bit
I find that a 32-Bit Windows XP is the best place to develop for the Nintendo 64. It’s still compatible with a lot of 1999-2000 software as well as more modern tools so it provides a good middle ground.
In order to do this, you need:
- Windows 7 Professional/Ultimate with Windows XP Mode
Or:
- A Window XP CD/ISO
- A virtual Machine like Oracle VirtualBox (free) or VMware Workstation (paid)
Installing the Windows XP virtual machine
If you want to use Windows XP Mode, follow these instructions.
Otherwise, you can do as follows to install using a virtual machine:
- Download and install virtual machine software using the links above.
- Create a new virtual machine using your Windows XP CD/ISO. We’re not going to use anything too intensive, so allocate about 218MB for RAM and 2GB of drive space. Your mileage may vary.
If you’re using VMware, I recommend that you install VMware Tools by going to VM > install VMware Tools, which will make the virtual machine a whole lot easier to use. This will allow drag and drop file copying, as well as the ability to click out of the window without ctrl + alt.
From now on, perform all tasks on your virtual Windows XP unless stated otherwise!
Getting N64SDK and N64dev
These are folders that contain functions, samples and some programs that will be used for Nintendo 64 development. N64SDK is more essential, but N64dev has some programs that will be useful later on.
- Get a file decompression program like WinRAR or 7Zip. This decompresses .zip, .rar, .7z and more compressed file types so it’s awesome.
- Download the N64SDK and N64dev and extract them into your root C:\ drive
Installing GNU on windows
All the GNU make tools should have been installed with the n64sdk file, so all you need to do is add it to the WinXP PATH variable. All you need to do is this:
- Start menu
- Right-click on
My Computer> ClickProperties Advancedtab > ClickEnvironment Variables- Under
System Variables, findPath. Select it and pressEdit - Add
;C:\ultra\GCC\MIPSE\BINto the end of theVariable Value- Note: That first semicolon is important as it separates this new addition from the other things inside Path.
- Press OK on all dialogues to confirm that it’s added.
Now you can access all the tools in that directory from any command line on your VM.
In order to run some Linux commands on a windows PC like ‘make’ and have your C code compile correctly, you’re going to need to install Minimalist GNU for Windows or ‘MinGW’.
Standard mode
Try using this method first, since it’s the most legitimate and will give you the latest version on MinGW.
- Download MinGW.
- Install MinGW with the standard configurations.
Mirror mode
I’ve had reports of the download file not working so if that fails, try this instead.
- Download the ‘installed’ version from the Mediafire mirror.
- Unpack it and put it in your C drive so that it appears like C:\MinGW\
Install the devkit programs
There is also a set of programs that are used for the Nintendo 64 development that came on a CD. These will help you manipulate files that will be included in your ROM, as well as convert files from your creative suite into a more N64-readable format.
Using your Virtual Machine
Using VirtualBox as an example, once you’ve loaded up your desktop in the virtual machine:
- Download the ISO for the tools
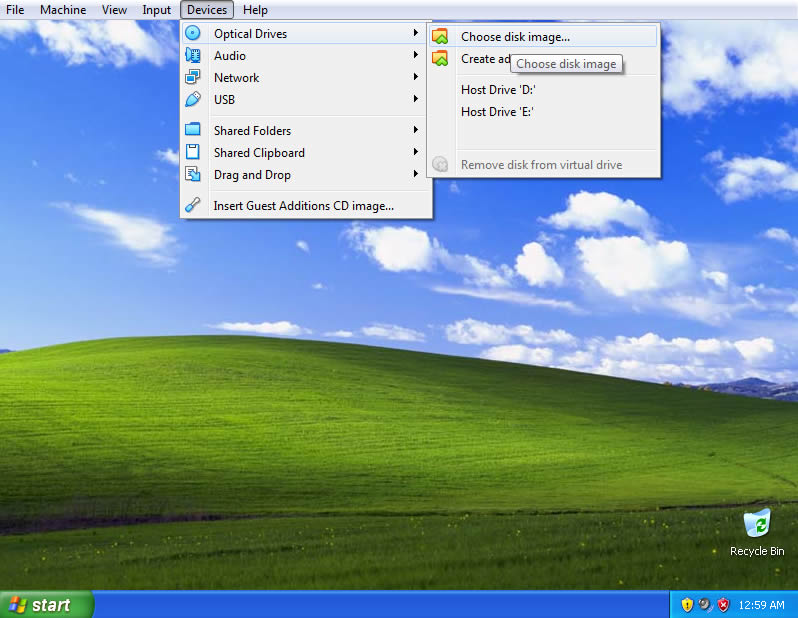
- Go to Devices > Optical Drives > Choose Disk Image
- Mount the ISO
- Run the installer like normal.
With Daemon Tools Lite
This method is deprecated. Back when I wrote this page in 2016, Daemon Tools Lite was free. Now it’s either paid or has a whole bunch of adware/spyware. Not the Daemon that I remember using in 2008.
- Install Daemon Tools Lite
- Download the ISO for the tools.
- Mount the ISO using DTL.
- Autorun the CD from your ‘My computer’
- Install the standard installation
Optional programs
These are programs that while not essential, are more modern and will help you build your projects a lot more easily.
File Transfer
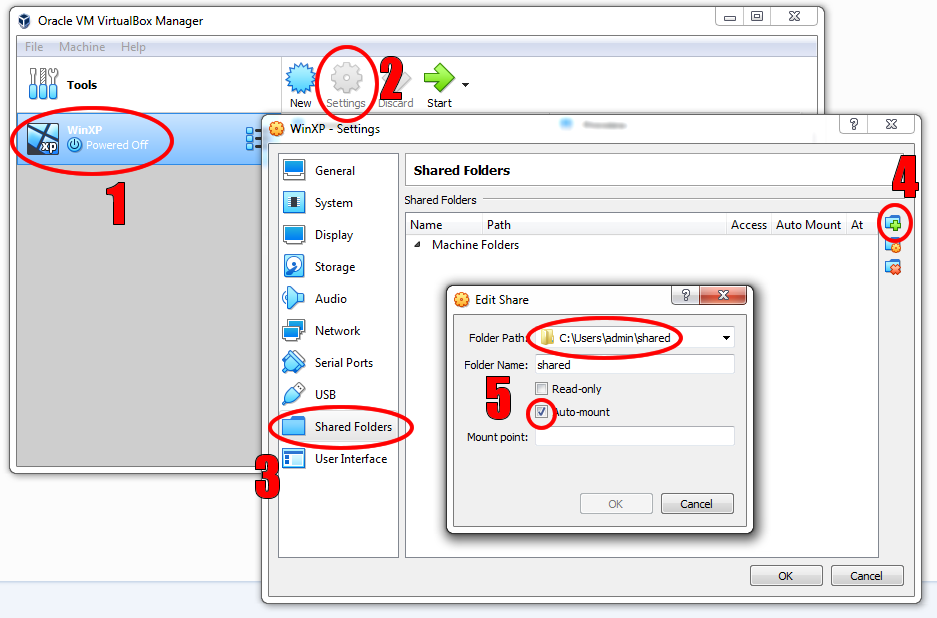
If you’re using VirtualBox, you can create a shared folder to instantaneously transfer files between your host and your VM. Follow these steps (ensure your VM is off first):
- Select your VM
- Go to your VM’s settings
- Choose ‘Shared Folders’
- Add shared folder
- Select the folder from your host, and auto-mount it.
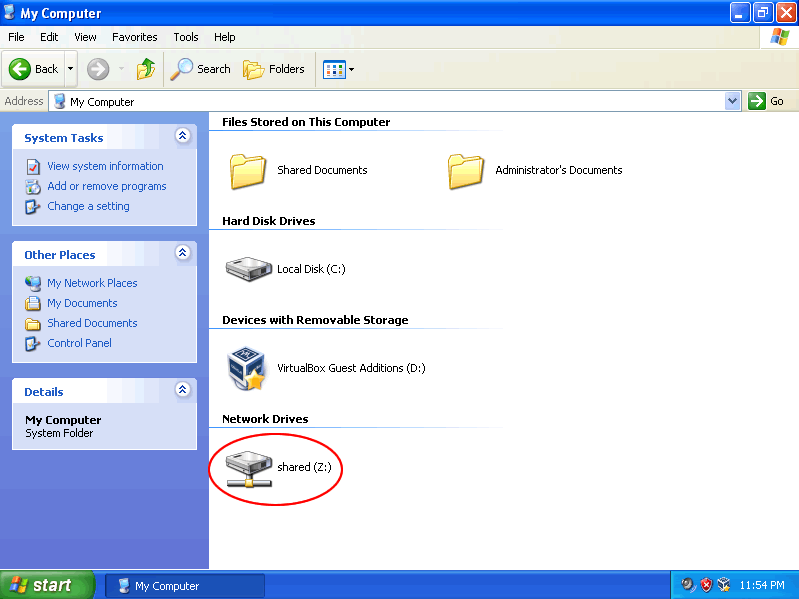
Next, you need to install guest editions. With your machine on, go to Devices > Insert Guest Additions CD Image. Then go through the installer and reset your VM when it prompts you in the end.
If it all goes correctly, you will see your drive in your WinXP’s “My Computer”.
Other methods
Since Dropbox will be dropping its support for Windows XP, I recommend that you install Sync.com to automatically share files with your host computer if you’re using a virtual machine with ease.
Emulators
You need an emulator to test out your games. If you use an Everdrive or 64drive, that’s fine but using an emulator will allow you to test whether your ROM works without that extra transfer step.
My preference for emulation is Project 64, but note that on a powerful computer the speed of the game will be very fast so take the output with a pinch of salt.
I’ve also used 1964 in the past. Strangely, it works for pretty much everything that Project 64 doesn’t work for.
Mupen 64 is also pretty good, or so I’ve heard.
Image and texture manipulation
The GNU Image Manipulation Program (GIMP) is a free image editor that you can use that will allow you to edit and export .rgb and .rgba files, which is what the N64 dev kit uses to import files.
However, you can always just use some other kind on standard image manipulation like Paint.net or Adobe CC to make images and use a converter like X2C to make it n64-readable
Text editors for programming
Code::Blocks allows you to easily manipulate the C code that runs your games. You could use notepad if you wanted to, but Code::Blocks is made with C programming in mind.
Another option is to use Sublime Text 3 or Notepad++, which are more general-purpose text editors for programming but might have a more appealing interface for you.