Making sprites with mksprite
Mksprite is a tool by the Libdragon team that allows you to convert PNG image files into libdragon-usable .sprite files.
Note: this page is about the stable mksprite. For information on how the mksprite on the unstable branch works, visit the wiki page.
Downloading mksprite
Building it from scratch is a pain in the butt, let me tell you. It’s much easier just to download it. You can get it from the download page by using the password howdoicompilethis. This executable is for 64-bit Windows machines.
Building the executable
This took me a loooooong time to figure out, so this is as much of a guide for you as it is for me for future reference. It’s not too late to turn back and just download it.
In order to get this working, we’ll need to perform a few steps:
- Install libpng
- Install zlib
- Make the executable
To do this, you’ll need some kind of GCC installed, I’m using MinGW 64-bit.
Installing libpng
I’ll break this up into two sub-steps: Building the library and installing it into GCC.
Getting the library files
Start by getting the latest source code from the website and extract it using your favourite zipping tools. You should have a folder with a lot of source files in it.
Next, since we’re using GCC, we want to use the GCC makefile. so go to the scripts folder and find a file called makefile.gcc. Copy it up a level into the main libpng source folder and rename it to just makefile (remove the ‘.gcc’ extension.
Do the same with another file in the scripts folder, pnglibconf.h.prebuilt. Move it into the main folder and remove the ‘.prebuilt’ extension.
Once that’s done, you can run the make command in the main folder and it should compile. You’ll get a pngtest.exe file which isn’t useful to us, a bunch of .o files which we’ll ignore and a file called libpng.a which is our library file that we were looking for. Eureka!
Installing into GCC
Now that we have our libpng.a file, we can start copying things over.
Go to your GCC installation directory. For me it’s C:\mingw64. In there, we’re looking for two folders called include and lib. However, these are not necessarily the folders located in your GCC directory. I think that when you’re using a 64-bit GCC, the folders you’re looking for are in the 32-bit subdirectory. That’s a bit confusing, so let me show you some examples of where you might find the folders.
32-bit
C:\MinGW\libC:\MinGW\include
64-bit
C:\mingw64\x86_64-w64-mingw32\libC:\mingw64\x86_64-w64-mingw32\include
This will vary depending on what version of MinGW you are using, but that’s the gist of it. If in doubt, go to your folder and search for a file in stdlib like stdio.h. This will be found in the correct includes folder.
Now it’s time to copy over the files. Go to your libpng folder that you were working on earlier and copy libpng.a into the lib folder.
Then copy all the header files (ending in .h) into the includes folder. These are the ones I copied over:
- png.h
- pngconf.h
- pngdebug.h
- pnginfo.h
- pnglibconf.h
- pngpriv.h
- pngstruct.h
And that aught to do it! You can now call in libpng using this includes statement: #include <png.h>
Installing zlib
Zlib is a dependency of libpng, so we’ll have to install that as well. Older versions of libpng have it included, but let’s use the latest ones in our project.
The process is similar to the above, so I’ll break it down into similar sections.
Getting the Library files
Grab the latest version of the source code from the zlib website and extract the folder.
Open the extracted folder and ignore the Makefile. This one isn’t going to work for our purposes. Instead do what we did with the other library and open up the win32 folder and copy Makefile.gcc into the main libz folder.
Next open up the terminal and navigate to the folder using the cd command. Then run the following command to make using the correct makefile:
make -f makefile.gccThis should compile the source files. You should end up with a file called libz.a.
Installing into GCC
I won’t go into too much detail since this was covered in the previous section, but you should copy this file into the same /lib/ folder:
- libz.a
And this file into the /include:
- zlib.h
These files might be included already, but this will update them to the latest version.
Making mksprite.exe
Now that we have the libraries in place, it’s time to build mksprite.exe.
First, go to the mksprite folder which should be located inside your project if you initialised Libdragon correctly at:
{project_home}/libdragon/tools/mksprite
Next we need to make some changes to the Makefile:
- Add
-lztoLDFLAGS. - Replace
$(CC)withgcc. Or addCC=gccto your environment variables.
Now we’re ready to make mksprtie.exe. Use this command in the terminal:
make mksprite
You should end up with a mksprite.exe file in the directory. It won’t run on its own, since it requires a .dll file. You can find zlib1.dll in your zlib folder, it should have compiled at the same time as libz.a.
Bonus: I like to move mksprite.exe and zlib1.dll to the same folder as libdragon.exe from the first tutorial so that it’s a bit cleaner and so that it all lies in the PATH, making it more accessible.
Using mksprite
The basic usage of mksprite from the command line is like this:
mksprite <bit depth> [<horizontal slices> <vertical slices>] <input png> <output file>Here are the parameters:
<bit depth>(required) is either16or32, depending on how many bits per pixel you want the sprite to be.<horizontal slices>and<vertical slices>(optional) how many slices are in the image. Useful for sprite sheets with many different images.<input png>(required) input file name relative to the current directory<output file>(required) name for the output file
Here is an example:
mksprite 16 player.png player.spriteAutomating mksprite
That’s just the basic usage of mksprite. To really up our game, let’s automate the process so that we don’t have to run the command every time we update our images. To do this, we’ll be putting some extra folders and add some clauses to our Makefile.
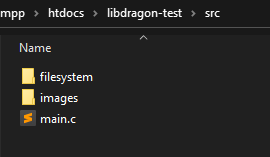
Start by adding in some folders in your /src/ directory: images and filesystem. These will be used for our source images (.png files) and our output images (.sprite files) respectively. It should look like this:
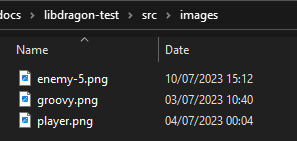
Put all your .png files into the images folder, like this:
Now that the files are in place, let’s amend the makefile. We’re going to need to run the mksprite command in a loop to convert all of the sprite images, so let’s make it looks like this:
V=1
SOURCE_DIR=src
BUILD_DIR=build
IMAGES_DIR=$(SOURCE_DIR)/images
IMAGE_FILES:=$(wildcard $(IMAGES_DIR)/*.png)
SPRITES_DIR=$(SOURCE_DIR)/filesystem
SPRITE_FILES=$(subst images,filesystem,$(IMAGE_FILES:.png=.sprite))
include $(N64_INST)/include/n64.mk

all: hello.z64

.PHONY: all

OBJS = $(BUILD_DIR)/main.o

$(SPRITE_FILES): $(IMAGE_FILES)
	@echo "Processing file" $(notdir $(subst sprite,png,$@))
	mksprite 32 $(IMAGES_DIR)/$(notdir $(subst sprite,png,$@)) $@

hello.z64: N64_ROM_TITLE="Hello World"
hello.z64: $(SPRITE_FILES)

$(BUILD_DIR)/hello.elf: $(OBJS)

clean:
	rm -f $(BUILD_DIR)/* *.z64
.PHONY: clean

-include $(wildcard $(BUILD_DIR)/*.d)
Lines 4-7 have some new variables. Line 5 in particular searches for png files in the src/images folder, and then line 7 does some substitutions to convert them to the /filesystem/ directory with a .sprite extension.
Line 16-17 create a new target for the sprites. We run mksprite on every file found, and place them in the src/sprites folder. Line 20 then add them as a requirement for building our ROM file.
This is a fairly simple addition with some limitations (all sprites are 16-bit, there is no horizontal/vertical slices, etc) but this can be fixed by making a more complex makefile command that treats additional subdirectories differently.
Adding sprites to your ROM
Note that if you want to add the sprites you made to your ROM, you have to use the Dragon File System (DFS).

