Saving data on EEPROM

Electronically Erasable Programmable Read-Only Memory (EEPROM) is a chip on the N64 cartridge that contains 4kb (512 bytes) or 16kb (2048 bytes) depending on the game. When using an emulator or a flash cart (like is normal with homebrew games), there isn’t an EEPROM chip but rather a .eeprom file that is created.
This data is very limited so it isn’t used for storing any game data like code or assets but rather just game progress data. For example, you can save a level counter in just one byte (up to 28 levels), or an int storing a high score (max 232). This means that we can store more complicated saves with more detailed progress, item/money counts etc.
It’s not going to be enough to hold something like custom map data or a large amount of custom characters which was used by some games like Command & Conquer, Starcraft 64 or Pokémon Stadium. For those kinds of games you’ll need SRAM or FlashRAM which Libdragon does not support. If you really need large saves, you can use a Controller Pak instead.
There are two ways of accessing the EEPROM: High and low-level. They both have very similar ways of working, but use which ever one makes more sense to you. Just make sure to stick to only one method.
Setting your EEPROM mode
The ROM needs to have some information about what kind of EEPROM you’re using since we don’t have a physical EEPROM chip to detect, especially when running on an emulator.
It’s really simple, just add one of these lines to your Makefile alongside your other .z64 rules:
# No save
game.z64: N64_ED64ROMCONFIGFLAGS=-w none

# 4kbit
game.z64: N64_ED64ROMCONFIGFLAGS=-w eeprom4k

# 16kbit
game.z64: N64_ED64ROMCONFIGFLAGS=-w eeprom16k
You can also do it manually by compiling the file in your Libdragon directory at libdragon/tools/ed64romconfig.c and running it against the file like this:
ed64romconfig -r -w eeprom16k game.z64Note that when starting your EEPROM save for the first time, all bytes will be set to 0xFF (or unicode ÿ when viewed in some text editors).
High-level EEPROM
Unlike the other subsytems in Libdragon, the high-level EEPROM method of saving doesn’t have an init() function (low-level does). You do, however, need to check to make sure that there is an EEPROM chip present, which you should have created in the above step.
// Check what type of EEPROM we have
// 0 -> None
// 1 -> 4kbit
// 2 -> 16kbit
eeprom_type_t eeprom_present(void);
You can then check the block count if you like. Each block is 8 bytes (64 bits).
// Check the size of the EEPROM (in blocks)
size_t eeprom_total_blocks(void);
Reading/writing
You can read and write from the EEPROM by either reading one block (8 bytes) at a time or several at once.
One block at a time
To read one block of 8 bytes, you need to start by preparing a buffer/array to hold the data. The buffer needs to be of type uint8_t or unsigned char. Then, you need to use the eeprom_read() function to fill the buffer wit the the values from that EEPROM block.
// Function prototype
void eeprom_read(uint8_t block, uint8_t * dest);

// Create and allocate memory for an 8-byte buffer
uint8_t* buffer = malloc(8 * sizeof(uint8_t));

// Load the data from block 0 to the buffer
eeprom_read(0, buffer);

// Print it out to the console.
// On the first time, should print: FF FF FF FF FF FF FF FF
for(int i=0; i<8; i++) {
	printf("%x ", buffer[i]);
}
printf("\n");
To write to a block, it’s a similar process. You need a buffer/array of 8 bytes with the data you want to copy, and then send that over to the EEPROM using the eeprom_write() function.
Continuing on from the previous example,
// Set the buffer to the numbers 0 to 7
for(i=0; i<8; i++) {
	buffer[i] = i;
}

// Write buffer to EEPROM
eeprom_write(0, buffer);
Now the EEPROM file should look like this if you open it (created from an emulator):

And the next time you load the ROM with the reading code, it will print out the values that were saved.
This example will read from EEPROM and then write to EEPROM, making it so that the results are different the second time you load it.
#include <stdio.h>
#include <stdlib.h>
#include <libdragon.h>
int main(void) {
console_init();
int i;
// Create and allocate memory for an 8-byte buffer
uint8_t* buffer = malloc(8 * sizeof(uint8_t));
// Load the data from block 0 to the buffer
eeprom_read(0, buffer);
// Print out our EEPROM info
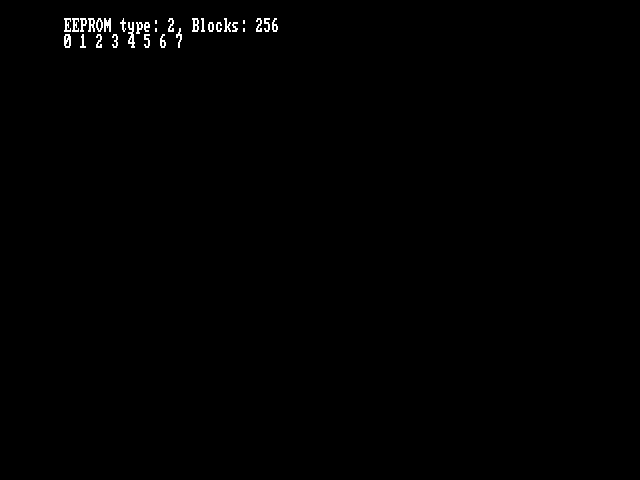
printf("EEPROM type: %i, Blocks: %i\n", eeprom_present(), eeprom_total_blocks());
// Print out the buffer
for(i=0; i<8; i++) {
printf("%x ", buffer[i]);
}
printf("\n");
// Overwrite the buffer with numbers 0-7
for(i=0; i<8; i++) {
buffer[i] = i;
}
// Copy the buffer to the EEPROM
eeprom_write(0, buffer);
// Infinite loop
while(1) {}
}Many blocks at once
This is another method of reading and writing from EEPROM where you can work with larger chunks of data at a time. It works in a very similar manner to memcpy() from stdlib’s string.h, but with an external memory instead. Here are the function prototypes:
void eeprom_read_bytes(uint8_t * dest, size_t start, size_t len);
void eeprom_write_bytes(const uint8_t * src, size_t start, size_t len);
Basically, it’s (local address, EEPROM offset, memory size) for both functions. Simple as. Here are the lines from the previous example, but modified to use these new functions:
// Reading
// Block method
eeprom_read(0, buffer);
// Read 8 bytes from EEPROM starting from position #0 into buffer
eeprom_read_bytes(buffer, 0, 8);

// Writing
// Block method
eeprom_write(0, buffer);
// From buffer, write 8 bytes starting from position #0 into EEPROM
eeprom_write_bytes(buffer, 0, 8);
As you can see, it’s much more flexible than the previous method.
Low-level EEPROM
There is another way of accessing EEPROM data on your Nintendo 64 using Libdragon, which is by using the low-level filesystem method. It’s a little bit more convoluted but it also works well.
Data preparation
The low-level involves much more planning and organisation to get your data onto the EEPROM.
Data structure
The first step is to configure how you want to save data. Say for example, we have an arcade game where we want to save 10 high scores, their corresponding 3-character initials and the max level reached as two arrays like this:
typedef struct {
	char initials[3];
	uint32_t score;
	uint8_t max_level;
} high_score_t;
This gives us a struct which (when unpadded) is 8 bytes long (3+4+1). This is great because the EEPROM stores data in blocks of 8 bytes at a time, so we’ll only need ten blocks to store 10 high scores.
If your data doesn’t fit in a multiple of 8, you will experience some unusable memory since the difference will be lost as padding.
Variable
Next, you need to assign it to a variable. This is generally done in a global scope unless it’s something you’re only going to access once. Make it an array of known size if you have several scores, or just a single one otherwise.
// Save one high score only
static high_score_t high_score;

// Save 10 high scores
static high_score_t high_scores[10];
EEPROMFS entry
The last data structure we need to prepare is the EEPROMFS. It works kind of like how the DFS works in that we have some virtualised files, but instead of being saved in the ROM file, they are being saved in the EEPROM file.
The EEPROMFS entry data type is a listing of all the various data types included in your save file.
In our example, we have ten high scores, but we might also have saved settings, or a save file with current game progress. Here’s an example of both:
// Save the high score array
eepfs_entry_t save_entry = {"scores.dat", sizeof(high_scores)};

// Save multiple data types
eepfs_entry_t save_entries[] = {
	{"scores.dat",		sizeof(high_scores)},
	{"settings.dat",	sizeof(settings_t)},
	{"saves/slot1.sav",	sizeof(save_slot_t)},
	{"saves/slot2.sav",	sizeof(save_slot_t)},
	{"saves/slot3.sav",	sizeof(save_slot_t)}
};
Populating the data
You can now populate the data in the structure. For the sake of argument, I’ll set them upon declaration, but you’ll normally want to set the values in the structure during gameplay.
static high_score_t high_scores[10] = {
		{"ABC", 12345, 1},
		{"DEF", 476535, 2},
		{"GHI", 987656, 16},
		{"JKL", 31459, 31},
		{"MNO", 821456, 45},
		{"PQR", 258741, 4},
		{"STU", 16145, 2},
		{"VWX", 65536, 3},
		{"YZ!", 2084, 85},
		{"ASS", 31337, 56}
};
Initialising and validating
Now that we have a structure to hold the data we want to save, it’s time to send it (or populate it from) the EEPROM.
The first step is to initialise the EEPROM subsystem. The first parameter is the eepfs_entry_t struct we created earlier, and the second one is how many entries there are. Ours only has one (the high scores file), so it will be just one; but if you have an array of entries (eg scores, settings, save slots, etc), it should be the length of the array.
// Initialise the EEPROM
int result = eepfs_init(&eepfs, 1);

// Check to make sure the EEPROM initialised correctly
switch (result) {
	case EEPFS_ESUCCESS:
		printf("Success!\n");
		break;
	case EEPFS_EBADFS:
		printf("Bad filesystem\n");
		return 1;
	case EEPFS_ENOMEM:
		printf("Not enough memory\n");
		return 1;
	default:
		printf("Unknown error\n");
		return 1;
}
The initialisation function then returns a result which tells us how well it worked.
Then it’s time to perform a quick validation check. The EEPROMFS reserves the first block of memory in the EEPROM as a sort of checksum that makes sure the data is valid. We can do a validation check to make sure that the data isn’t corrupt.
if (!eepfs_verify_signature()) {
	// Something went wrong
	// error handling goes here
}
Here’s some info on what each byte in the signature means if you’re interested:
- Letter ‘e’
- Letter ‘e’
- Letter ‘p’
- File count minus 1
- Total bytes divided by 256
- Last 8 bits of total bytes
- Checksum divided by 256
- Last 8 bits of checksum
Writing
Before we start reading from the EEPROM, it’s best to start by writing to it using eepfs_write(). An initial state can be started by testing the validation, wiping the save file using eepfs_wipe() and writing an initial state.
This function requires the destination filename of your entry on the EEPROM, the source struct and the size of the struct.
// Check the signature
if(!eepfs_verify_signature()) {

	// Clear all data
	eepfs_wipe();

	// Write to EEPROM
	int result = eepfs_write("scores.dat", &high_scores, sizeof(high_scores));

	// Check for errors
	if (result != EEPFS_ESUCCESS) {
		printf("EEPROM write failure #%d\n", result);
		return 1;
	}
}
Reading
Similarly, you can perform a similar function to read from saved memory. This one will amend the data in your struct in memory with that of what you have in the EEPROM.
The reading function eepfs_read() takes the same parameters as the writing function: file on the EEPROMFS, destination struct and size of struct.
int result = eepfs_read("scores.dat", &high_scores, sizeof(high_scores));Finishing things off
Now it’s finally time to see how we can do a couple of other functions to systematically finish working with the low-level EEPROM.
Closing the subsystem
This is simple, a function that closes the subsystem returning 0 or an error upon completion.
int eepfs_close(void);Clearing data
There are two ways to clear data wholesale. Using this function will clear all data and write a new signature. Note that it is slow and will stall the CPU for about 1 second for 4kbit and 4 seconds for a 16kbit EEPROM, even if you’re not using all of it.
void eepfs_wipe(void);You can also use this other function to clear individual files/entries from your EEPROMFS. It’s useful if you want to revert things back to their default state.
// Function prototype
int eepfs_erase(const char * path);

// Example
int result = eepfs_read("scores.dat");
Which one to use?
Generally speaking, the high-level method is best for storing bits of data and the low-level method is better for storing structured data.
But let’s have a look at the more precise timings of each operation. It doesn’t matter much because it’s not an operation that you’re going to be performing all the time, but it’s worth a look.
High-level method
Here’s a comparison of the high-level method of accessing the EEPROM using the block-by-block method in a loop (eeprom_read()) versus one call of the mass-memory method (eeprom_read_bytes()).

As you can see, they are almost identical, mostly differing by fewer than 5 microseconds.
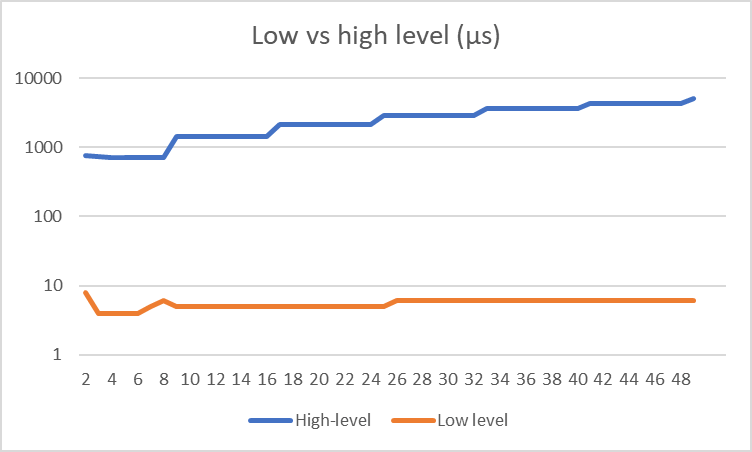
Low-level vs High-level
The comparison between high and low level read is night and day. Here we’re comparing how long it takes to read n bytes of data using both methods. Note that the difference was so large that I had to switch to a logarithmic scale.
Speed summary
Basically, the low-level method takes longer to implement and to also write all the code, but it provides more structured data formats and faster speeds. High-level is slower, but it’s much easier to implement for a save file that isn’t very big and doesn’t need to be accessed very often. Good for an end-of-level savepoint.